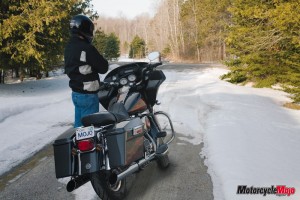
By the time some of you read this, you may already have your bike out and have pounded a few hundred kilometers on it, much like my neighbour Adam. Depending on which part of the country you call home will have a big impact on your accumulated mileage since points between the west coast and the east coast have vastly different weather patterns. Vancouver riders have been riding for a month or more and others on the west coast ride all year round. Some locations in Alberta have seen motorcycles on the road for some time now while the Maritimes, Quebec, Ontario and the Prairie Provinces still had freezing temperatures, snow banks, white fields and the odd lingering snowstorm in the forecast. In short, it has been a longer than normal winter for much of Canada.
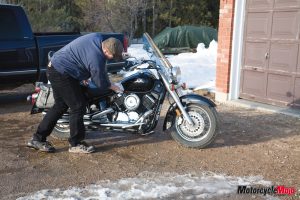
As temperatures rise with the sun’s rays, us motorcycle types get anxious to get our wheels out of hibernation and get rolling down the road again for that burst of cool, but fresh, spring air. Personally, I don’t like to get my bike out until we have had a couple of good hard rains to wash the salt off the roads.
In order to make those first rides more enjoyable, a little time spent on a few basic tasks on your iron steed will help make the spring rides as memorable as possible. The following quick checklist won’t take you very much time, but that, of course, depends on how you put your bike into hibernation last fall. If you followed the regular procedure for storage, you should be out riding within an hour or so once you decide that the time is right.
For those of you that have owner’s manuals for your motorcycle, you will find the manufacturers recommendations for getting your bike out after an extended storage period. Owner’s manual or not, the following recommendations are some quick and simple rules to follow to make your first spring ride a great one.
Many riders like to work on their own bikes so this is a pretty thorough checklist for those of you that take the hands-on approach to motorcycle maintenance. Even if you are one that lets your dealership look after your bike at the end of riding season, store it and get it ready for spring riding season, you will still find this checklist useful as it contains simple tasks that you should be performing on a regular basis throughout the riding season.
Some of the basic no-brainer items to check first and foremost are safety items like tires, brakes and steering, but there are a few more things to look over that don’t take much time.
Many of these simple checks should be performed on a daily, or at least weekly, basis and should be part of your regular riding schedule. To make the checklist easy to remember, the Motorcycle Safety Foundation has come up with an acronym for the list of daily or weekly checks—T-CLOCS. We have elaborated on that checklist as the basis for a more comprehensive description of those acronym components.
T – Tires (and wheels)
C – Controls
L – Lights (and electrical)
O – Oil (and fluids)
C – Chassis
S – Stands
1 TIRES AND WHEELS
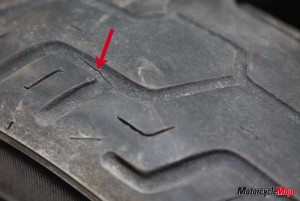
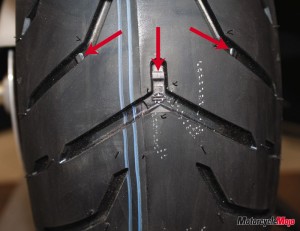
T Not enough can be said about the condition of your tires. It’s not much wonder you will always hear this, but when you consider that there’s only two pieces of rubber the size of your palm that is separating you and your bike from the road, take the advice and thoroughly inspect your tires. Obviously tire air pressure is the most common item people think of when someone mentions they have to check their tires but there is more to tires than simply checking air pressure. Be sure to check the general appearance of the tire carcass – tread depth, no cords or threads are visible and make sure that the tire wear indicators, AKA wear bars, are not showing at tread level. Depending on the make of the tire, wear indicators might be slightly raised portions of the tire carcass and quite hard to find or may be a definite bump visible at the bottom of the tread. In order to have your bike pass a safety certification in Ontario, the tread surface has to be a minimum of 2.5 mm above a wear indicator. Regardless of the type of wear indicator, common sense must prevail. If the tread looks low, play it safe and get new rubber. Also, carefully check for cracks and tears as a result of running over debris in the road. Inspect your tires after confirming the proper tire pressure; sometimes a tire with low air pressure may close-up a tear that can become apparent when it’s at the proper pressure.
2 SPOKES
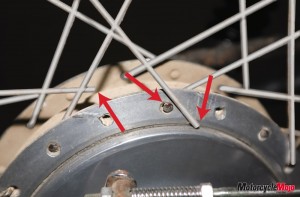
Other things to check in the tire area are spokes if your bike is so equipped. Spokes look nicer on some bikes than others but also require more maintenance. Try squeezing them together. If they move at all, your spokes need to be tightened. Another way to determine if your spokes are loose is to tap them with a wrench. If you hear a ‘ping’ they are likely in good condition but if a ‘thud’ is what you hear, that spoke is loose. There are varying procedures for tightening up spokes depending on whom you talk to, but I suggest for your first time, or if you are unsure of how to do it, take your bike to a motorcycle technician. Without experience or the proper hardware, it’s easy to get your rim out of true, making it a wobbling mess—you don’t want that.
3 RIMS
On any kind of rim, check for damage where the tire meets the rim and have a look at the wheel bearing seals. Has any grease been leaking? If you can raise your bike so the wheels are off of the ground, grasp the top and bottom of the wheel and try to wiggle. If you feel any play, that means your wheel bearings need attention and you should have your mechanic look at it.
4 BRAKE PADS
On most bikes with disc brakes, you should be able to see the brake pads if you position yourself just right (there are two of them per caliper, one on each side of each rotor). You might have to enlist the help of a flashlight. Have a quick look to ensure there is some brake lining left on them. Remember, brakes are an important main-tenance item and just looking at your brakes is no substitute for regular service.
5 CONTROLS
Check all levers and pedals for operation, especially the brakes before you get out on the road. Make sure you have a good solid feel to the brake pedal and lever. A soft or spongy feel indicates that there is air in your hydraulic system and this should be attended to right away. Your brake fluid level should be checked and if it is more than a couple of years old it should be replaced. Brake fluid absorbs moisture and begins to break down over time.
6 HYDRAULIC HOSES
Be sure to have a look at the hydraulic hoses for your front and rear brake system. Check for cracks or any kind of damage to the rubber coating. Mice will chew on anything over the course of the winter and rubber hoses can be one of the items mice find tasty. I once saw a car come out of storage from a barn and all the brake lines were chewed through. We concluded that it was a raccoon or a porcupine that did it.
7 CLUTCH AND CABLES
Make sure the clutch lever pulls smoothly. If it doesn’t, it may indicate a frayed cable or one that needs to be lubricated. The same thing goes for your throttle cables. When the throttle is opened it should snap back, and while you have the engine running, turn the handlebars all the way to the right and left and make sure the engine rpm does not change.
8 LIGHTS AND ELECTRICAL
L After re-installing your fully charged battery for this riding season, be sure the connections are secure and while you are at it, try to wiggle the positive cable on the starter and the negative cable on the frame if you can get to them. The starter connection especially gets a fair bit of vibration and the cable can loosen up over a riding season. A loose connection can also act like a battery that has gone south and the law of averages says it will leave you stranded at the most inopportune time.
9 BATTERY
The life span of a motorcycle battery is generally around five years. I have seen them go longer but they can also die at any time. If you have any reason to believe your battery might not be up to snuff, change it. Motorcycle batteries can be boosted like a car, but quite often a motorcycle battery isn’t readily accessible, often hidden beneath the seat or side covers.
10 WIRING/AIR FILTER
While you have the seat off or any side covers necessary for battery installation, pay attention to the wiring that may reside in the hidden recesses of your bike. Remember, mice find homes during the winter and battery boxes are perfect places for them. I once had a trail bike that I wintered in a garden shed. A mouse had taken up residence in the air box and made a nest that included pieces from my air filter. To top it off, the hungry rodent had eaten all of the wires that passed through the immediate area. I have to tell you from personal experience; don’t show your kids. They will either want to keep the cute little mouse as a pet, or at the very least, will accuse you of killing a harmless defenseless animal because you are taking away its home.
Now would be a good time to check your air filter and air box if equipped.
11 HANDLE BAR SWITCHES
Check all the handle bar switchgear and the components they control like the horn, turn signals, high beam and so forth, and that includes the idiot lights on your instrument cluster. Also remember to check the brake light’s operation with both the rear brake pedal and the front brake lever.
12 CHECK OIL AND FLUIDS
O As mentioned earlier about brake fluid, all fluids need to be changed at their prescribed intervals and the best time to change them is when the bike was put away at the end of riding season. That way the fresh liquid is protecting the internal parts and reservoirs they reside in and saves you a lot of time in the spring by not having to change them then.
13 ENGINE OIL
Engine oil especially should be changed in the fall and the fresh oil distributed throughout the engine by running it before storage. Dirty engine oil contains impurities from combustion and generally breaks down over time. It’s better not to be sitting in, and on, vital engine components over the long winter.
Refer to your owner’s manual or dealership for the proper procedure for checking the engine oil and if applicable, the trans fluid. Some bikes, and this sometimes varies between different models by the same manufacturer and even different years of the same models, require a different procedure for checking fluid levels. Some use a dipstick while either on the side stand or standing straight up, and others use a sight glass that is usually in an impossible spot for a single person to see. Usually a sight glass requires a second person to view it while someone sits the bike up right, or at least a mirror is needed so the rider can sit the bike up straight and then use a mirror to view the sight glass at the bottom of the engine.
14 COOLANT
Some motorcycles require coolant for the engine and it should be checked whenever the oil is checked. The coolant also needs to be replaced just as brake fluid does as it too breaks down over time. Again, check your owner’s manual or dealership for the proper type of coolant to use and the frequency of which it should be changed.
15 DRIVESHAFT
Those bikes that use a driveshaft for their final drive will have gear oil in the differential that needs to be checked and/or replaced. This is special oil that is designed to withstand enormous pressures from the mating gears and like other fluids, needs to be changed periodically.
16 CHECK QUALITY OF GAS
If you filled your fuel tank and used Sta-bil, or another brand of gasoline conditioner in the fall, you should be ready to start your bike up and ride as normal. If you didn’t fill the tank up, look inside and check if the gasoline is cloudy, indicating moisture from condensation. If it’s cloudy you may want to drain the fuel and the carburetor float bowl (if your bike is carbureted) and replace with clean gasoline. From personal experience, I find that fuel with Sta-bil in it burns much more quickly than regular gas so don’t venture far from a gas station until you have used all the Sta-bil diluted gasoline and filled the tank with fresh fuel.
17 CHECK FOR LEAKS
While you are checking over everything that contains liquid of any kind, be sure to keep an eye out for any leaks. Now is the time to fix them, or have them fixed. All fluids are vital to a machine’s well-being and you don’t want any mechanical item to do without the proper amount of fluid. Fluid leaks can also get on tires making them extremely slippery and dangerous for obvious reasons.
18 CHASSIS
C If you are able to lift the front-end of the bike off the ground, turn your steering from left lock to right lock and feel for any tight or rough spots caused by an indentation in the steering head bearings. To check for looseness in the steering head, pull and push on your handlebars while the front wheel is off the ground. If you feel any tight or rough spots or any looseness, have it checked and repaired right away.
19 FRAME
Check the frame junctions and welds for cracks, especially on older bikes. Flaking paint at a welded juncture could indicate hidden problems and should be investigated.
20 SWING ARM
If you are able to lift the rear tire off of the floor, after checking for wheel bearings as mentioned previously, grab the back of the tire and try to move it sideways. If the bearings felt OK but you are feeling a side-to-side movement by pushing and pulling the back of the wheel, this indicates swing-arm bushings or bearings and they will need to be adjusted or replaced. This will be most noticeable while cornering; the back-end will feel kind of loose.
21 FINAL DRIVE OR BELT
Check the final drive chain or belt. Rotate the rear wheel while it is up in the air and feel for tight spots. A belt should be smooth but a chain, by nature, could feel like it has a tight spot. It is at this tight spot where you check the tension of the chain. Refer to your manual or dealership as to the proper chain or belt deflection and adjust accordingly, remembering to adjust both sides of the axle adjustment equally.
22 TIGHTEN NUTS AND BOLTS
Put a wrench on the nuts and bolts throughout the chassis to ensure they are snug. Look for any missing cotter pins, fasteners and damaged threads.
23 SUSPENSION COMPONENTS
Check front and rear suspension components and settings. Grab a fist full of front brake and give a good hard push forward. The front suspension should smoothly compress slightly and rebound back to its normal position. Sitting on the bike should smoothly compress and rebound the rear suspension as well. The amount of compression will depend on the bike and the settings that the suspension is set to.
24 GREASE
Be sure to grease all grease nipples. If you are unsure of their location, refer to your owner’s manual or ask at the dealership.
25 STANDS
S Make sure that side and centre stands are working properly and smoothly. Ensure the ignition cutout switch works or adjust accordingly. Check mounting bolt tightness and that the return springs are in good condition and not loose. If you lose a spring, your kickstand will fall down and drag along the ground. This could be especially detrimental to your health if you are on a right hand bend, your side stand swings out into its fully extended position and you then straighten up or head into a left hand bend with your kick stand out – ouch. It won’t be pretty.
26 FINALLY! STARTING IT UP
After you have checked out your bike and you feel it is time to start it up, remember to always let the engine warm up first. This is more noticeable on carbureted engines but it is better for the health of all engines. Warming the engine up while stationary lets the engine components heat up at the proper gradual pace instead of some parts heating up faster than others, as is the case when riding away with a cold engine. Your engine will thank you for it later in its life.
If you failed to squirt oil in your cylinders in the fall, you might find it hard to start the engine. Try squirting a bit of oil in the cylinders and spin the engine without the sparkplugs installed. Be sure to ground the sparks so they can release the pent up energy. A couple of squirts of oil will help regain the compression that can wane from the lack of piston movement all winter.
27 GET REACQUAINTED
And don’t forget about tuning yourself up. Take it easy, go to an empty parking lot and reacquaint yourself with the brakes and the weight of the bike. Watch for annual spring hazards like sand in the corners, and cold pavement and tires that can result in less grip on the road. All of which can ruin a perfect cornering experience if you’re not careful. Frost and a harsh winter can also take a terrible toll on our roads, so keep an eye out for chunks of pavement scattered on the roadway and the resulting holes.
Have a safe riding season! Glenn


